Overall I thought this class was very good and I learned a great deal in the course. I enjoyed having a hands on project and having the opportunity to design and build a fully functioning machine. In the class I learned a lot about how important the design process is, especially when you have so many components and modules working together.
In the beginning of the class I felt a lot of time was wasted on FRDPARRCS instead of more meaningful topics. It would have been nice to do some things in lab that dealt with the things covered in lecture like gear ratios and linkages. We learned about some things in lecture that we never even touched on during lab. So when we were trying to come up with a design in the beginning we shied away from more complex designs because we didn’t understand some concepts fully. It would have been much better to assign the teams sooner in the semester so we could have more time to work on the machine design. It would have been nice to have the kit as soon as we get into our teams to see exactly what materials we had to work with. The homework assignments in the beginning didn’t seem to help with the project very much. It would have been nice to have assignments geared more toward the kind of stuff we would need to know for the project. When registering for this class it said this class did not require physics, but the homework seemed to deal with quite a bit of physics. The physics required wasn’t very hard, but it was still beyond what we were learning at physics at the time. It would have been nice to have more recitations so more could attend because I was always busy during that time.
Having to manufacture everything was a great learning experience. It was good to learn that just because you can design something, doesn’t mean you can actually manufacture it. It also gave me a good understanding at how precise manufacturing can actually be. This class has given me much more respect for how difficult manufacturing can be. I think it would have been nice if we could have had some lab time in the machine shop before we actually started on the project besides just the training sessions. Then we could have had a lab assignment on the manufacturing process so that we would have a little more experience before starting the project.
It was very helpful to have the CAD lab and assignments. I feel much better knowing Solidworks because I know that will be integral part of being a mechanical engineer. It would have been nice to learn some more complex processes in Solidworks. Also being able to get the Solidworks on our personal computers was extremely beneficial so we wouldn’t have to spend countless hours in the library doing CAD.
I could have improved my performance in this class by going to office hours for the homework assignments instead of just struggling to do it on my own. I know I could have planned my time better and not waited until right before the due date to do the assignments.
Sunday, December 13, 2009
Spencer's Self-Evaluation
During the course of the semester I learned a lot of different things. During the design and manufacturing phase, I learned that designing is much more important than the actual manufacturing. I feel this way because without a good plan then you are basically going to be wasting time in the machine shop. At the same time the design process is about compromise. You could want a cool and unique machine, but you may have to compromise creativity for reality. Basically, is this idea possible and if so will it work with all the constraints. The reality also deals with the ability to manufacture the piece. I learned that the best thing to do while machining is to double check. As Bob would say, "Measure twice and cut once." Machining is about precision and with precision comes time, I learned that it take a long time to make something how you planned. Because of this, in the design process it is good to not over-tolerance a piece so that it is actually possible to make.
The compromising from the design aspect also goes along with being a good teammate. Your teammates might not like your idea or you might not like theirs, and you will have to be able to make a compromise and maybe use an idea of yours or theirs on another part of the project. With that said, I also learned that you have to be able to take criticism, and give constructive criticism. Without these traits there will be no team chemistry and it will be difficult to complete the project.
As stated before, machining takes a long time. More than I would have ever anticipated, this was the main thing I learned about the time management portion of a design project. It was very difficult to balance this work load with all the other classes I had going on, but I survived.
But the greatest asset I gained for ME 240 was the experience. It was my first design class and a lot more difficult than I thought it would be. But because of this I do feel I will be more prepared for my future design classes and able to manage them more easily.
This course could be improved in a number of ways. As mentioned before, it was a very heavy load, maybe lighten the load or spread out the assignments more reasonably. For the assignments, it was never very clear on what we were going to be graded on, I felt we just lost points and never knew really why. I am aware that this is the first time this was ever done, but hopefully in the future it is a little more organized. We were designing things before we had the rules, so it just felt like those ideas were pointless in the grand scheme of things. I think this is already fixed now that the arena is built and basic rules are set, but I think there needs to be fewer constraints. I would suggest allowing the robots to be touching a few balls at the start. This would lead to more unique and interesting designs because the teams wouldn't have to worry about deploying it into the slot and can use that extra motor for something else like a shooter, catapult, etc. On the day of the competition, I think you should have the teams transfer their own robots, because ours was broken when we got there and I heard some other team's were too. It wouldn't have affected the outcome but I felt cheated since the machine was working the day before.
To improve my performance I could have taken more time on some of the homeworks, and actually done all of them. Maybe spend more time during the designing phase and measured everything carefully to make sure there were no interferences on the final machine. If this would have been done, then there would have been no way that the machine would have broken on the transfer over.
Final Team Da Fever Documentation


*If you are interested in looking at the final bill of materials, please click on the picture of the grid and it should come up*
Our final machine was much different than anything we had first conceived. Origianlly we had a set of chopstick-like arms that were deployed, wrapped around a column of balls and then lifted back into the cart or over the center divider
We quickly realized that it would be really difficult to get the arms to only wrap around the balls without getting caught on the walls. We also weren't sure how to make sure that the arms would go around the squash balls without getting stuck.
Then we created a power screw wedge (much like the design today) that would screw down into the balls and supposedly provide enough downward force to push past the squash balls.
The arm was housed in a cart so that we could move the arm around within the arena depending on how the opponent played. We also had to make variations to the arm, like attaching a delrin plate to the wedge to fill up the whole slot and not allow balls to move past the wedge. It was also found that brackets would have to be attached to the threaded rod so that the arm wouldn't fall off the rail.
Towards the end of the manufacturing time, it became obvious to us that we had to do a few more tweaks to the design to allow for more gear ratios within the motor, a bigger slot within the base of the cart to allow for the descending arm, and a reinforced chassis on the underside of the cart to reduce bending and warping of the wood due to motor torque.
The final machine had two individual front axles to allow for the lowering and raising of the arm. The cart had a wood base with a slot cut out of the middle for the arm. The cart itself was large enough to take up the whole arena, it was used as a defense mechanism in case there were projected balls. For the back axle, there was a motor attached to allow for movement. The motor to move the arm up and down was housed in the back. The motor to move the wedge up and down within the rail was housed on top of a plate, which moved with the rail up and down. The rail was used to keep the wedge in the arena and provided resistance against the wedge so that it could be used as a power screw.
Our machine wasn't very successful in the final competition, but I believe a part of it was due to a loose motor, one that had been loosened during the grading portion the night before, as well as some other loose screws and failing parts after the grading. It was also due to the fact that we needed to have a motor with less torque but much faster than the competition.
Emily Matula's Team Reflection
I was very excited to take this class because I felt that it was my first real experience of what a mechanical engineer should be. I was also very lucky because most of the troubles experienced by my classmates were due to pre-requisites that weren’t listed but were still used. So I think one way that this class could be improved would be to really study in detail the lesson plan and make sure that some extensive use of a different classes material is listed and maybe suggested as a prerequisite or a class to be taken side-by-side. I was a little disappointed in how things were weighted. I would have liked to have had more individual assignments during the design process that were weighted a little higher. I just feel that during the group work, most grades started to converge into one another and it was hard to try to get a higher grade due to group grades. I was a little disappointed with the time-line of the class. It seemed like there was tons of “down” time when we could have been conversing with groups and maybe finding out more about the specifics of the project instead of doing just fredparcs. I also was uneasy with the fact that we did shop training at the beginning of the semester and then didn’t use it until later. I feel that many people avoided using the machines because they felt they couldn’t use them correctly because they had forgotten their training.
I was very happy with what I learned in this class. Now at the end of class I feel very comfortable with almost all of the machines (still have to work on my feelings with the lathe) and I feel very comfortable asking either Bob or Marv any of my questions. I first was afraid of them due to their tough appearance and I was afraid that I might be judge with my lack of experience, but they were more than happy to answer any questions or give suggestions. I think I could have improved my performance by learning more about the lathe instead of shying away from it and letting someone else do it. I also could have let others do some of the required work instead of just trying to take it all on myself. I felt that the best way to get anything done correctly, was to do it myself, which wasn’t a good team mentality.
I am also excited by how much experience I have with Solidworks. I have applied to a few internships already with a very confident feeling because of their explicit need for someone who knows Solidworks. Learning how to read a tap chart and know what the best kind of gear or screw would be for a particular kind of job will definitely come in handy in the later years. I was a little upset that some of the homework didn’t include questions like “I am doing a particular project, what kind of bolts or size holes should I use and explain why” because I feel like that would have helped with the machines to give us a forward looking view when designing.
I am very glad I took this course, thank you again Professor Hart
Monday, December 7, 2009
Design Expo Video
http://dl.dropbox.com/u/495923/Engineering.m4v
a link to our video, if this isnt sufficient, we can bring in a copy of the video at the time of the expo
Sunday, December 6, 2009
Almost Done!!!
Well we're almost done! In the past week we finished manufacturing the majority of the components. We turned down all the shafts, after several attempts, due to the imprecision of the lathe machinery and the tight tolerances that we required on all of our shafts. We made two different types of brackets, brackets to hold the shafts and a few to hold the walls. We assembled all of the motors and began to attach them to the cart base. It was quickly figured out that we had to make a new place block for the motor that would drive the up and down motion of the arm so that it wouldn't interfere with the motion of the railing. The delrin plate was cut and filed to a point so that it would fit behind the balls in the arena. It was quickly found out that we needed to mill the plates to allow for the threaded rod to pass above the wedge. Some of our teammates figured out that you can take the vice off the milling machine and attach blocks and holding pins directly to the milling table. We used this technique in order to create the cutouts for the front wall and the side walls.
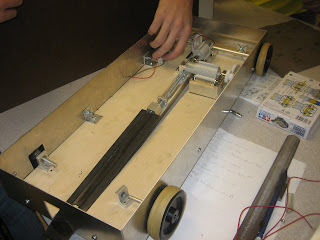 As you can see in this picture, we have most of the machine assembled. We must check our alignments within the arena and make sure that our wiring is secure and set up so that we can easily hook it up to the battery and control packs the day of the contest.
As you see below, we are thinking about how we could do some last minute defensive moves. There are a few materials that we haven't used yet in our kit, one of them is the mesh sheet. We were thinking of attaching it to the top of the cart to allow any rouge flying balls to slide back down our cart and back into their side of the slot. The only reason that we are not making this a top priority is so far we have not noticed any groups making a primary shooting device. Hopefully we get done in time and it works :)

Sunday, November 29, 2009
To-do List and Check Out Our Updated Schedule (Applied on to Our Old Schedule)
1. Cut out all remaining parts (Base, walls, and axles of cart)
2. Press fit all bearings, wheels, and axles together *Make sure to consult Bob about fits
3. Assemble all parts together (Walls to base, axles to base, and MCM to axles)
4. Re-adjust our gear ratio to allow for the wedge to drop faster behind the balls
5. Apply some soft material to the edges of our wedge and arm to make sure it doesn't harm the arena. Also, apply material to wheels to allow them to grip the arena better.
6. Make sure that when all components are assembled, they will fit the volume constraints
7. Test out how the motors work with the axles and the wedge
8. Hook up control box and make sure we know how to manuver all of our parts
9. Do test runs to make sure that there isnt any thing else needed
10. MAKE VIDEO
11. dont have a panic attack, jk :)
Thanksgiving Break and Looking Ahead
We can all agree that Thanksgiving break was too short, and came at the wost time possible. With tons to do ahead before the actual competition, I know 95% of our class is going to be stressed and stretched to their limits. Our MCM and total engineering review went well, but we realized that we have to make the whole cart and assemble all of the parts before Thursday. With our updated schedule, we have elected Thursday and Friday to be our trial and error days. That only leaves 3 days to manufacture the parts, in a lab with everyone else trying to do the same thing. I know that me and a few of my fellow teammates will attempt to dodge the frenzy by completing as many parts earlier in the day by getting to the shop right when it opens. This week we need to make the cart, press all gears and bearings to axles, increase our gear ratio to allow for a higher rpm of the motor, and make final tweaks to the design (like adding friction tape to the wheels or Teflon to the wedge). This week we will be using the lathe, mill, and the laser cutter for our last components.
We have a feeling that right now we are just going to make requirements. It would have been nice to win or to really be confident in our machine, but looking at other's progress, it is a little intimidating. This is a picture of the front axle we are going to manufacture from the 3/8" aluminium rod by using the
 band saw, mill and lathe to cut it down to size to fit inside the wheels.
Sunday, November 22, 2009
Exam and More MCM
Last week we did a lot of of our MCM manufacturing because we knew that this week we would be pretty busy with our exam. We took it on Tuesday, and from what we surveyed, no one finished and everyone was just happy to have it over. We did a lot of touching up of our main components, added an angle to our wedge. We also made threads within our wedge with a hand tap. There were two problems that arose with the hand-tap, our part was too thick to have the tap go through all the way. Marv was able to help by forcing a screw of the same size through the bar-stock, therefore forcing threads. The other problem was from the type of threads. It turns out that the threaded rod has Sharp V threads, while the hand-tap provided to us is Unified because when the edges of the threads were compared, one was sharp and the other was rounded. This means that it is very hard for the threaded rod to go through our wedge, which means we might have to find a new hand tap or re-do the tapping with a slightly bigger diameter. The rod has to go through the wedge easily in a power-screw formation. This will allow for our motor to raise and lower the wedge without a lot of torque needed, therefore extending the life of the motor.
This coming week, we are going to have to assemble all of our parts as well as finish the rest of our engineering. We will also have to get a head start on the rest of the manufacturing finished earlier on in the week, that way we can allow for the most time possible to test our machine.
This coming week, we are going to have to assemble all of our parts as well as finish the rest of our engineering. We will also have to get a head start on the rest of the manufacturing finished earlier on in the week, that way we can allow for the most time possible to test our machine.
Sunday, November 15, 2009
Milling pictures

 Us using the drill bit on the mill in order to make a few holes in our rail component, and Corey making sure that everything is in working order.
Motor Lab and MCM Manufaturing
This week started off with the motor lab in our lab section. We weren't able to finish in the time allotted, but almost everybody else didn't either. Wednesday we tried to continue with our lab, but was unable to because all of the aluminum shafts were being used. We were required to come back in later that day and try to finish. After burning out a motor because a previous user had set the starting voltage on the voltage source too high, and having a group take our coupling, we were able to finish as well as get the extra credit. The lab report was written without any outstanding problems and was able to turn everything in on time.
Unfortunately we had signed up to do a lot of our manufacturing for our MCM on Wednesday and Thursday, but due to the unforeseen complications with the motor lab and not being allowed to have 250 team members in the machine shop, we were forced to do all of our manufacturing on Friday. Our team made sure to get to the shop when it opened and worked until we got almost all of the parts done. We will still have to manufacture after the exam on Tuesday due to an unavailability of the mill.
We ordered some material from McMaster on Monday, and received it on Wednesday. It is solid aluminum 061 bar-stock, .75"x.75" so that we may be able to mill it next week into the wedge component of our module. We used the laser jet, band saw, and a little bit of the mill on Friday. Now it is up to us to finish the wedge component and get through the exam on Tuesday.
Monday, November 9, 2009


Sunday, November 8, 2009
Most Critical Module
The past week was spent finalizing and analyzing the most critical module of our machine. For our machine, we determined the most critical module to be the arm module. Without the arm, our team has no way to score, and little options for defense, thus the arm is essential to the machine. Our arm consists of a rail piece, a threaded rod, and an extension wedge. Initially the rail and extension are fitted together and the extension is then extended using the threaded rod.
We analyzed the critical module to calculate the torque required to lift arm with the weight of all the balls acting on it. We also created part drawings for the parts we will be manufacturing for the most critical module, as well as a bill of materials, and a manufacturing plan for each of the parts.
After the design review and other conversations with our GSI, our team has decided to continue with our basic design with the intent to add more complexity as time permits. We determined it would be much better to have a simple machine that functions than an over complex machine that doesn't function.
After some experimentation, we found that our swinging arm was having issues moving the rubber balls. They would get caught between the wedge and the wall and prevent any motion from our arm. We decided to add a plastic plate over our wedge to minimize this issue. The plate would be larger than the wedge, fitting into the slot very tightly so there is no room between the wall and the wedge for the ball to get caught.
Unfortunately, the CAEN computing labs were not cooperating today, thus pictures of the Most Critical Module will be posted shortly.
Thursday, October 29, 2009
Design
Our strategy requires the use of an arm and a cart. The whole apparatus is contained within the cart which will start over our slot and on top of the arena. As the game starts, we have our track arm telescope down. When the track arm is set into place then the pushing arm will engage by sliding down the track arm. It isn’t pulled down by gravity, but instead propelled downwards with a power screw. The pushing arm is a block with a sharpened wedge at the end. As the pushing arm is propelled downwards it will place itself behind the balls. Once it has hit the bottom of the arena, the cart will drive forward and the arm will be pushed along the bottom of the arena. If the middle section is blocked off by the opponent, it is possible to lift our arm up and gather a few of the balls into the cart. We can then attempt to drive over to the other side with our cart and park on the opponent’s side.
 Front view of the cart with view of arm
 Track arm and wedge extended

 Front view of the cart with view of arm
 Track arm and wedge extended
Top view of cart without motors or gears applied
Subscribe to:
Posts (Atom)